Originally By: Team SE-EDU Since: Jun 2016 Licence: MIT
Updated By: CS2103 F10-B1
- 1. Setting up
- 2. Design
- 3. Implementation
- 3.1. Backup mechanism
- 3.2. addRelationship command
- 3.3.
colorTagcommand mechanism - 3.4. deleteRelationship command
- 3.5.
editRelationshipcommand - 3.6. removeTag command
- 3.7.
relPathcommand mechanism - 3.8. Enhanced
findcommand - 3.9. Undo/Redo mechanism
- 3.10. Enhanced
addcommand mechanism - 3.11. Sort Command mechanism
- 3.12.
clearHistorycommand mechanism - 3.13. Logging
- 3.14. Configuration
- 4. Documentation
- 5. Testing
- 6. Dev Ops
- Appendix A: User Stories
- Appendix B: Use Cases
- Appendix C: Non Functional Requirements
- Appendix D: Glossary
1. Setting up
1.1. Prerequisites
-
JDK
1.8.0_60or laterHaving any Java 8 version is not enough.
This app will not work with earlier versions of Java 8. -
IntelliJ IDE
IntelliJ by default has Gradle and JavaFx plugins installed.
Do not disable them. If you have disabled them, go toFile>Settings>Pluginsto re-enable them.
1.2. Setting up the project in your computer
-
Fork this repo, and clone the fork to your computer
-
Open IntelliJ (if you are not in the welcome screen, click
File>Close Projectto close the existing project dialog first) -
Set up the correct JDK version for Gradle
-
Click
Configure>Project Defaults>Project Structure -
Click
New…and find the directory of the JDK
-
-
Click
Import Project -
Locate the
build.gradlefile and select it. ClickOK -
Click
Open as Project -
Click
OKto accept the default settings -
Open a console and run the command
gradlew processResources(Mac/Linux:./gradlew processResources). It should finish with theBUILD SUCCESSFULmessage.
This will generate all resources required by the application and tests.
1.3. Verifying the setup
-
Run the
seedu.address.MainAppand try a few commands -
Run the tests to ensure they all pass.
1.4. Configurations to do before writing code
1.4.1. Configuring the coding style
This project follows oss-generic coding standards. IntelliJ’s default style is mostly compliant with ours but it uses a different import order from ours. To rectify,
-
Go to
File>Settings…(Windows/Linux), orIntelliJ IDEA>Preferences…(macOS) -
Select
Editor>Code Style>Java -
Click on the
Importstab to set the order-
For
Class count to use import with '*'andNames count to use static import with '*': Set to999to prevent IntelliJ from contracting the import statements -
For
Import Layout: The order isimport static all other imports,import java.*,import javax.*,import org.*,import com.*,import all other imports. Add a<blank line>between eachimport
-
Optionally, you can follow the UsingCheckstyle.adoc document to configure Intellij to check style-compliance as you write code.
1.4.2. Updating documentation to match your fork
After forking the repo, links in the documentation will still point to the se-edu/addressbook-level4 repo. If you plan to develop this as a separate product (i.e. instead of contributing to the se-edu/addressbook-level4) , you should replace the URL in the variable repoURL in DeveloperGuide.adoc and UserGuide.adoc with the URL of your fork.
1.4.3. Setting up CI
Set up Travis to perform Continuous Integration (CI) for your fork. See UsingTravis.adoc to learn how to set it up.
Optionally, you can set up AppVeyor as a second CI (see UsingAppVeyor.adoc).
| Having both Travis and AppVeyor ensures your App works on both Unix-based platforms and Windows-based platforms (Travis is Unix-based and AppVeyor is Windows-based) |
1.4.4. Getting started with coding
When you are ready to start coding,
-
Get some sense of the overall design by reading the Architecture section.
-
Take a look at the section Suggested Programming Tasks to Get Started.
2. Design
2.1. Architecture
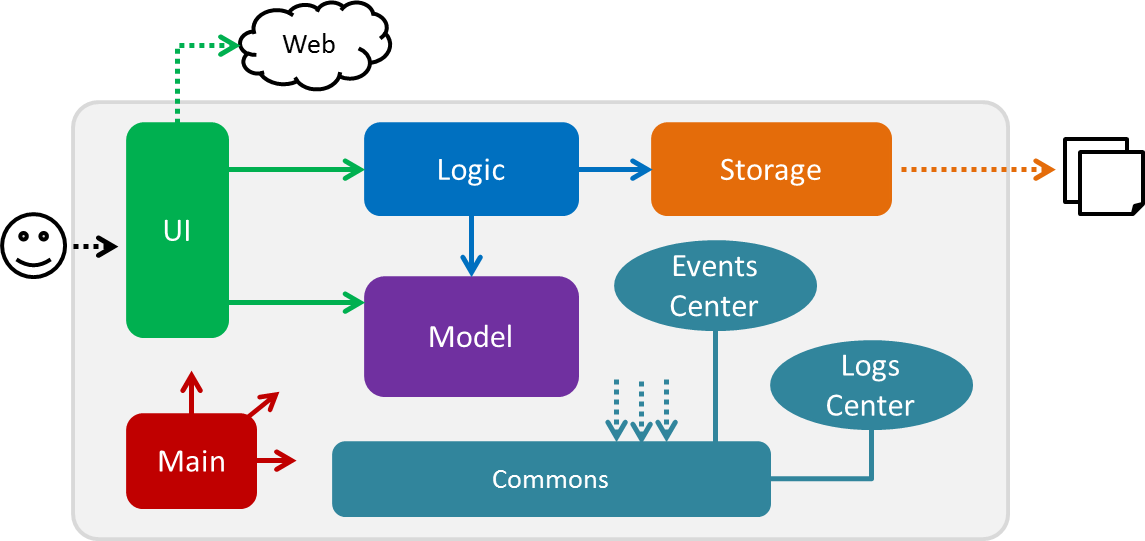
Figure 2.1.1 : Architecture Diagram
The Architecture Diagram given above explains the high-level design of the App. Given below is a quick overview of each component.
The .pptx files used to create diagrams in this document can be found in the diagrams folder. To update a diagram, modify the diagram in the pptx file, select the objects of the diagram, and choose Save as picture.
|
Main has only one class called MainApp. It is responsible for,
-
At app launch: Initializes the components in the correct sequence, and connects them up with each other.
-
At shut down: Shuts down the components and invokes cleanup method where necessary.
Commons represents a collection of classes used by multiple other components. Two of those classes play important roles at the architecture level.
-
EventsCenter: This class (written using Google’s Event Bus library) is used by components to communicate with other components using events (i.e. a form of Event Driven design) -
LogsCenter: Used by many classes to write log messages to the App’s log file.
The rest of the App consists of four components.
Each of the four components
-
Defines its API in an
interfacewith the same name as the Component. -
Exposes its functionality using a
{Component Name}Managerclass.
For example, the Logic component (see the class diagram given below) defines it’s API in the Logic.java interface and exposes its functionality using the LogicManager.java class.
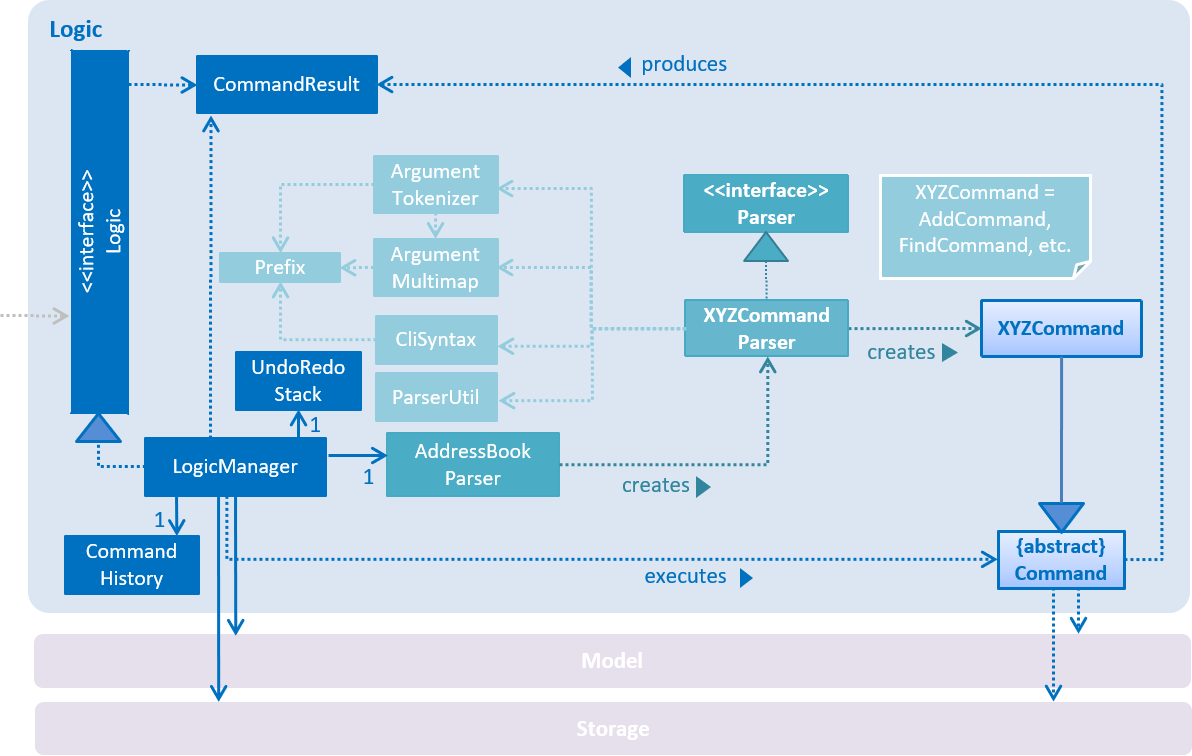
Figure 2.1.2 : Class Diagram of the Logic Component
Events-Driven nature of the design
The Sequence Diagram below shows how the components interact for the scenario where the user issues the command delete 1.
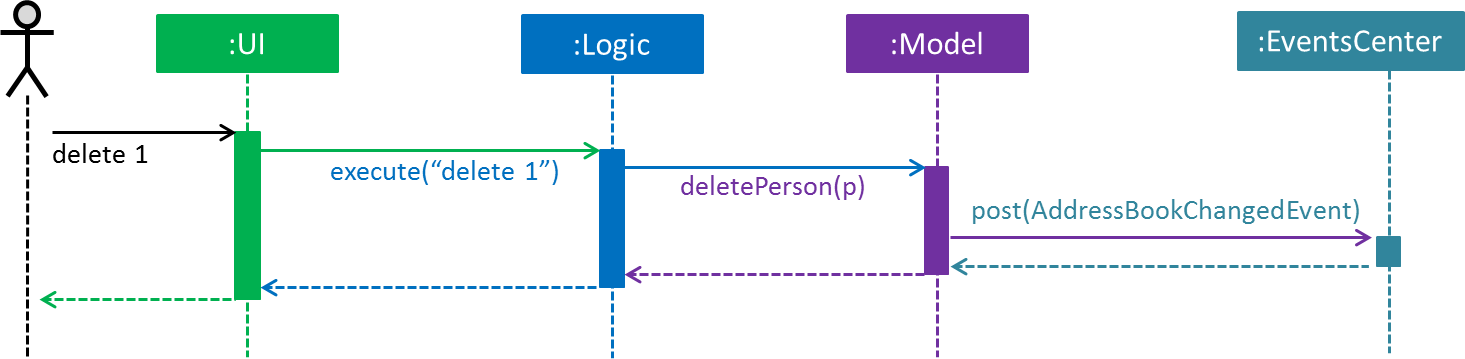
Figure 2.1.3a : Component interactions for delete 1 command (part 1)
Note how the Model simply raises a AddressBookChangedEvent when the Address Book data are changed, instead of asking the Storage to save the updates to the hard disk.
|
The diagram below shows how the EventsCenter reacts to that event, which eventually results in the updates being saved to the hard disk and the status bar of the UI being updated to reflect the 'Last Updated' time.
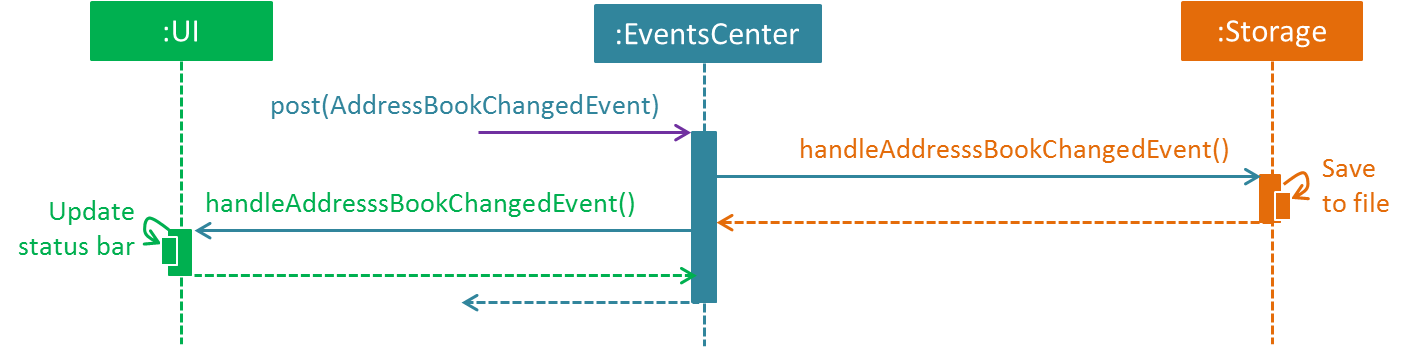
Figure 2.1.3b : Component interactions for delete 1 command (part 2)
Note how the event is propagated through the EventsCenter to the Storage and UI without Model having to be coupled to either of them. This is an example of how this Event Driven approach helps us reduce direct coupling between components.
|
The sections below give more details of each component.
2.2. UI component
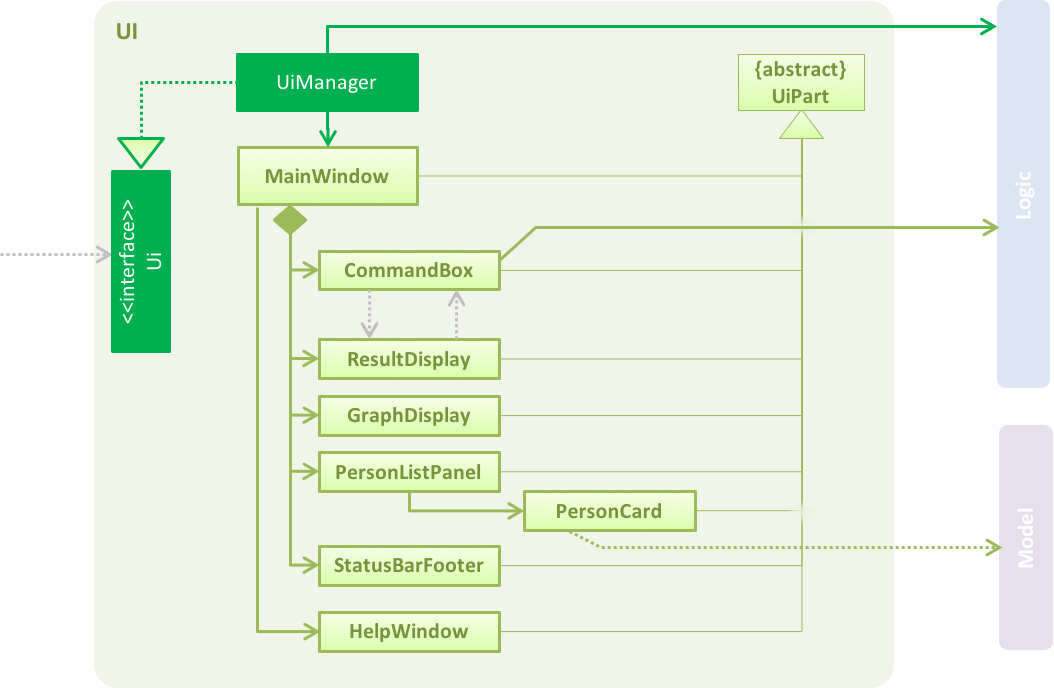
Figure 2.2.1 : Structure of the UI Component
API : Ui.java
The UI consists of a MainWindow that is made up of parts e.g.CommandBox, ResultDisplay, PersonListPanel, StatusBarFooter, GraphDisplay etc. All these, including the MainWindow, inherit from the abstract UiPart class.
The UI component uses JavaFx UI framework. Additionally, the graph display also involves the dynamic graph library GraphStream. The layout of these UI parts are defined in matching .fxml files that are in the src/main/resources/view folder. For example, the layout of the MainWindow is specified in MainWindow.fxml
The UI component,
-
Executes user commands using the
Logiccomponent. -
Binds itself to some data in the
Modelso that the UI can auto-update when data in theModelchange. -
Responds to events raised from various parts of the App and updates the UI accordingly.
Note that the CommandBox and ResultDisplay are coupled components in our design due to the autocompletion feature.
2.3. Logic component
Figure 2.3.1 : Structure of the Logic Component

Figure 2.3.2 : Structure of Commands in the Logic Component. This diagram shows finer details concerning XYZCommand and Command in Figure 2.3.1
API :
Logic.java
-
Logicuses theAddressBookParserclass to parse the user command. -
This results in a
Commandobject which is executed by theLogicManager. -
The command execution can affect the
Model(e.g. adding a person) and/or raise events. -
The result of the command execution is encapsulated as a
CommandResultobject which is passed back to theUi.
Given below is the Sequence Diagram for interactions within the Logic component for the execute("delete 1") API call.
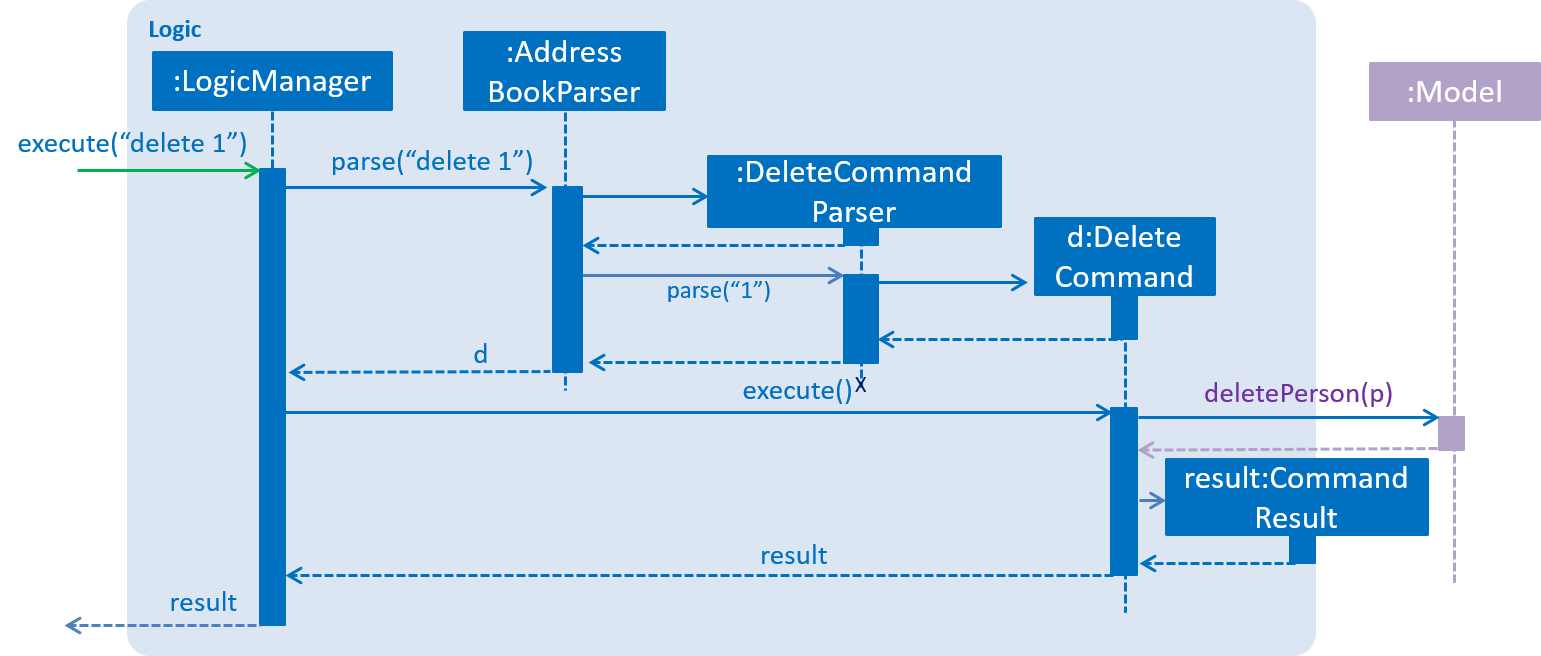
Figure 2.3.1 : Interactions Inside the Logic Component for the delete 1 Command
2.4. Model component
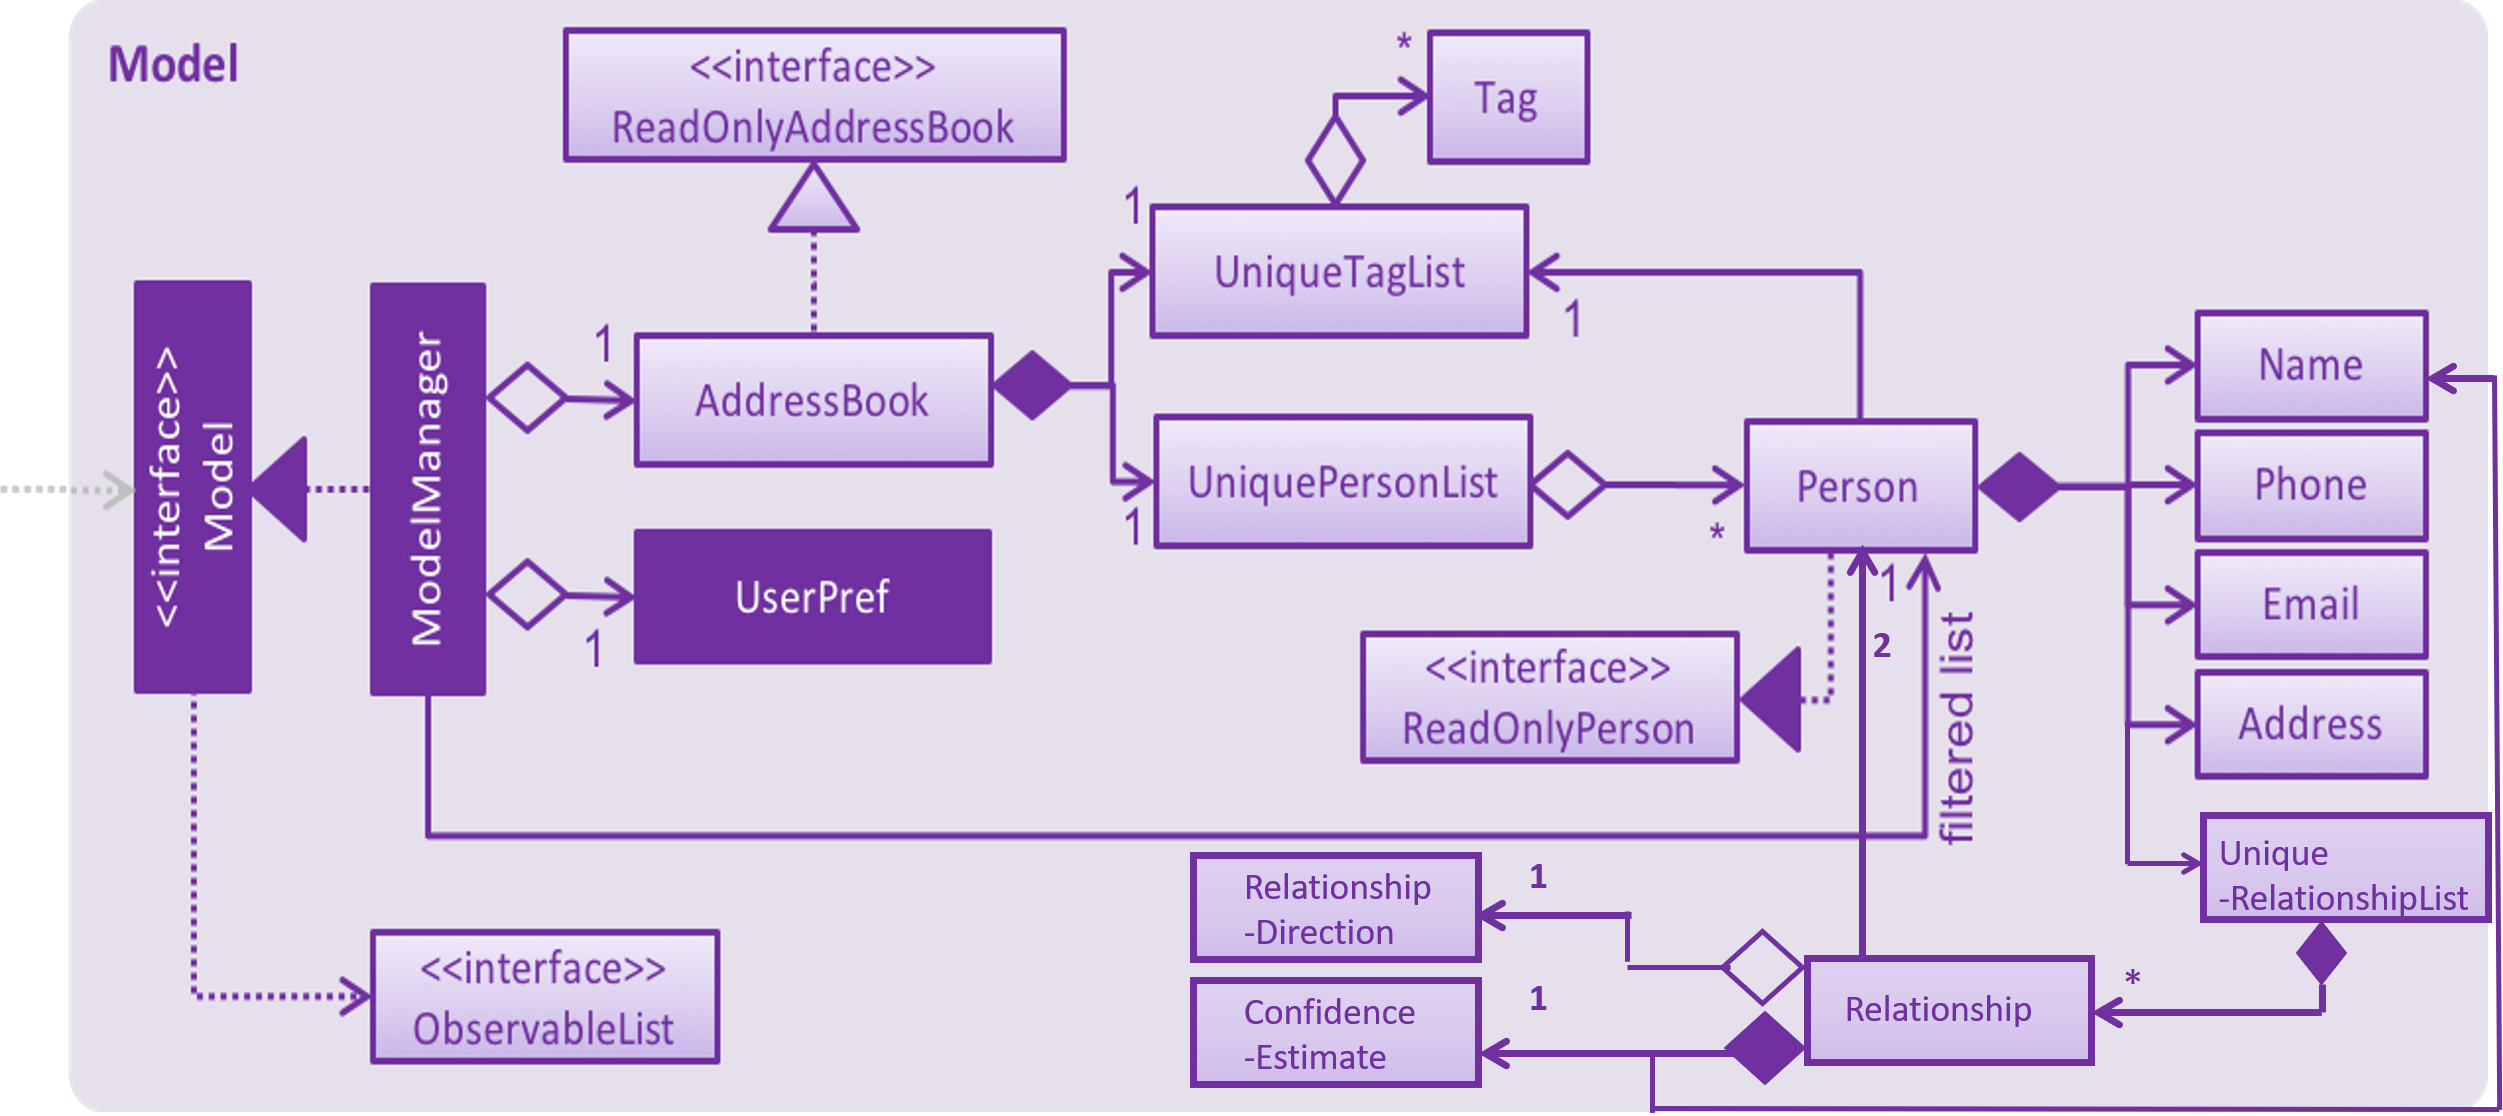
Figure 2.4.1 : Structure of the Model Component
API : Model.java
The Model,
-
stores a
UserPrefobject that represents the user’s preferences. -
stores the Address Book data.
-
exposes an unmodifiable
ObservableList<ReadOnlyPerson>that can be 'observed' e.g. the UI can be bound to this list so that the UI automatically updates when the data in the list change. -
does not depend on any of the other three components.
2.5. Storage component
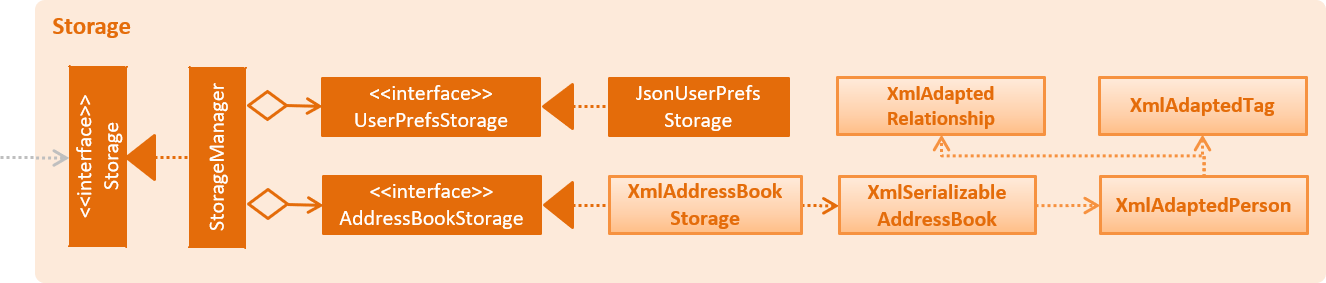
Figure 2.5.1 : Structure of the Storage Component
API : Storage.java
The Storage component,
-
can save
UserPrefobjects in json format and read it back. -
can save the Address Book data in xml format and read it back.
2.6. Common classes
Classes used by multiple components are in the seedu.addressbook.commons package.
3. Implementation
This section describes some noteworthy details on how certain features are implemented.
3.1. Backup mechanism
The backup mechanism is facilitated by the backupAddressBook() method added to the Storage component, which saves the current state of the address book to a predefined backup location (intelli.xml.bak in the data directory). This functionality is then invoked through the backup command, and the Command and Logic classes have been extended to have access to the Storage component of the address book.
3.1.1. Design Considerations
Aspect: Type of command implemented
Alternative 1 (current choice): Command
Pros: Simple to implement; undo / redo mechanism does not need to know how to interact with Storage to undo a backup.
Cons: Accidental backups may be invoked, potentially overwriting an existing backup.
Alternative 2: UndoableCommand
Pros: Possible to undo a backup; prevents accidental overwrites of an existing backup.
Cons: The undo / redo mechanism needs to be extended to be able to redo / undo backups, increasing interaction with the Storage component.
Aspect: Location of backup file
Alternative 1 (current choice): data/intelli.xml.bak
Pros: Easy to locate for the user; file is always in a predictable location.
Cons: Accidental backups may be invoked, potentially overwriting an existing backup in the same location.
Alternative 2: Add a timestamp to the backup filename
Pros: Will not overwrite existing backups, can serve as rudimentary version control mechanism.
Cons: User may not be aware of how many backups they have created; might cause a lot of backups to exist, creating confusion.
Aspect: Interaction between Command and StorageManager
Alternative 1 (current choice): Extend setData() to also recieve the Storage component
Pros: In line with existing architecture, does not introduce global state.
Cons: All invocations of setData() have to be changed; but only one command uses StorageManager, creating unnessasary busywork.
Alternative 2: Make StorageManager a Singleton
Pros: Does not affect existing commands; easy for BackupCommand to access.
Cons: Changes architecture of app, introduces more global state.
3.2. addRelationship command
The addRelationship command adds a directed or undirected relationship between two persons in the address book. Name and confidence estimate are the optional fields in this command. The user is able to view the changes in the relationships in the graph window.
3.2.1. Design Considerations
Aspect: Implementation for addRelationship command
Alternative 1 (current choice): The command is implemented by adding one additional attribute UniqueRelationshipList to each person.
Pros: Implementation is easier as it follows the same logic as having the UniqueTagList.
Cons: All the relationships in the address book are not organized into a single entity (e.g. an adjacency list) which is more intuitive when the implementation involves a graph.
Alternative 2: Organize all the relationships into a single entity, instead of making them into lists under persons in the address book.
Pros: It is more intuitive to organize all the relationships into a single entity when the implementation involves a graph.
Cons: Maintenance of this single entity of graph can be costly as it can become massive.
Cons: Currently a person is identified by his/her index in the most recent listing. As the indexes of persons change, matching the relationship to the correct persons involved will be a headache.
Aspect: Record of the relationship in the address book
Alternative 1 (current choice): A relationship between two persons are recorded in both persons' UniqueRelationshipList.
Pros: Easy search of the relationship in the address book as both parties involved in the relationship have record of it.
Cons: Maintenance of the relationships is troublesome as a single relationship has to be added, modified or deleted twice.
Alternative 2: A relationship between two persons are recorded in the fromPerson’s `UniqueRelationshipList, except that when the relationship is undirected, it is recorded twice under both parties.
Pros: Easy maintenance of the relationships.
Cons: More scenarios to consider when performing actions to the relationship. Hence, it will lead to more difficult implementation.
3.3. colorTag command mechanism
The colourTag command sets a tag colour for a given tag that is stored in UserPrefs as a Map<Tag, String> of tag-colour pairs.
3.3.1. Design Considerations
Aspect: Persistence mechanism for tag colours
Alternative 1 (current choice): Store in UserPrefs as GUI settings
Pros: Tag colour settings remain the same for different data files, more consistency for user.
Cons: Storage has to be extended to provide access to UserPrefs for Command, difficult to signal a tag colour change when no user data is modified.
Alternative 2: Store in XmlAddressBookStorage as user data.
Pros: Easier to signal tag colour changes to GUI.
Cons: Tag colours will be different depending on which data file is loaded, leading to inconsistency and confusion for the user.
Aspect: Location for storing tag colours
Alternative 1 (current choice): Global tag colour mapping
Pros: No possibility of two identical tags having different colours, easy to update all instances of one tag with new colour.
Cons: More difficult to indicate a tag colour change to the GUI as no user data is visibly modified+
Alternative 2: Each tag stores its own colour.
Pros: Easier to signal tag colour changes to GUI.
Cons: Possibility of identical tag containing different colours.
3.4. deleteRelationship command
The deleteRelationship command deletes a relationship between two persons in the address book. The user is able to view the disappearance of the relationship in the graph window.
3.4.1. Design Considerations
Aspect: Implementation for deleteRelationship command
Alternative 1 (current choice): The indexes of the persons specified in user input does not matter.
Pros: User only needs to remember the two parties involved in the relationship to be deleted, making this command more user friendly.
Cons: More memory needed for the double record of relationships under both parties involved.
Alternative 2: The indexes of the persons specified in user input matters.
Pros: Less memory needed for recording the relationship.
Cons: User has to know the specific information of the relationship, making this command not user-friendly.
3.5. editRelationship command
The editRelationship command edits a relationship between two persons in Intelli. Using this command, users can update the names and confidence estimates of relationships existing in Intelli without having to delete and add a new relationship.
3.5.1. Design Considerations
Aspect: Implementation for editRelationship command
Alternative 1 (current choice): The command is implemented internally as deleting an existing relationship and then adding a new relationship with the new name and the new confidence estimate.
Pros: Implementation does not have to access the internal state of a Relationship, and allows for immediate updates to the graph.
Cons: Additional step involved in having to delete and then add a new relationship between the same two persons.
Alternative 2: The command directly accesses and modifies the internal state of a Relationship.
Pros: The command can be completed in a single operation, which may be faster then deleting and adding a new relationship.
Cons: The change cannot be reflected dynamically on the graph after a successful edit.
Aspect: Type of command implemented
Alternative 1 (current choice): editRelationship command extends UndoableCommand instead of Command.
Pros: Users can easily undo their changes if they accidentally update the wrong relationship attribute or have mistakes in the updates (i.e. in the new relationship name/ confidence estimate).
Cons: Additional memory needed for recording the previous stage of the address book.
Alternative 2: editRelationship command extends Command.
Pros: No additional memory needed for recording the previous stage of the address book.
Cons: Users can do another editRelationship command to achieve the undo effect.
3.6. removeTag command
The removeTag command removes a tag with the specified name from the address book. All the appearances of the tag in the address book are removed.
This command is implemented in the style of the edit command and delete command.
3.6.1. Design Considerations
Aspect: Implementation for removeTag command
Alternative 1 (current choice): The command is implemented using methods which remove the tag from each person’s tag list.
Pros: Implementation is modular and less dependent on methods used for other commands.
Cons: More tedious to implement since it is not making use of the existing resources such as edit command.
Alternative 2: Adapt current edit command so that removing the tag is done by editing every person’s tag list.
Pros: Making use of existing resources and easier implementation.
Cons: More dependency between commands and the relationship between edit and remove is not clear.
Aspect: Type of command implemented
Alternative 1 (current choice): removeTag command extends UndoableCommand instead of Command.
Pros: Accidental removal of tags can be recovered.
Cons: Additional memory needed for recording the previous stage of the address book.
Alternative 2: removeTag command extends Command.
Pros: No additional memory needed for recording the previous stage of the address book.
Cons: As the removal of Tag is from all the persons in address book, an accidental removal can be disastrous if the user does not intend a complete removal.
Aspect: Removal of the tag from all instead of some by user’s choice
Alternative 1 (current choice): The command currently does not support the removal of a tag from persons specified in the user input.
Pros: Easier implementation since it does not deal with the parsing of more user input.
Cons: The user cannot remove the tags from a few specific people in one command.
Alternative 2: The command allows the user input to specify the persons from whom the tag should be removed.
Pros: The user can remove the tags from a few specific people in one command.
Cons: Implementation is more difficult as parsing of additional user input required. It is also unlikely for user to remove the tag from many persons at once, hence there is a function overlap with edit command.
3.7. relPath command mechanism
relPath finds a shortest relationship path between two people that has the highest minimum confidence estimate, and highlights this path on the graph display. In other words, it prioritises relationships with a higher confidence level over those with lower confidence levels when deciding the shortest path.
To do so, a modifiied version of the standard Dijkstra’s shortest path algorithm is used, which takes into account path width (the smallest confidence estimate on the path) and selects edges that maximises the minimum width of the path. The algorithm can be briefly described as follows:
-
For all persons from the source person, set the path width to them at -Infinity.
-
Keep track of the width of the path to each person from the source.
-
At each iteration, take the person with the smallest width so far and consider its outgoing edges. Add an edge into the shortest path to this person if it will increase the minimum confidence estimate of the path.
-
When all persons are processed, all shortest paths with the highest minimum confidence estimate will be found.
3.7.1. Design Considerations
Aspect: Implementation of modified Dijkstra’s
Alternative 1 (current choice): Extend the current Dijkstra algorithm in the GraphStream library.
Pros: Easy to implement since most of the algorithm is the same, easy to use with graph display.
Cons: Relies on external library for correctness, unable to guarantee correctness of external library.
Alternative 2: Implement modified Dijkstra’s from scratch.
Pros: Can ensure testablity and reliablity of own code, less reliance on external correctness.
Cons: More difficult implementation as it is from scratch, less compatability with graph display means integration between display and algorithm has to be manually written.
Aspect: Access to GraphWrapper from RelPathCommand
Alternative 1 (current choice): Make GraphWrapper a Singleton.
Pros: Easy to access from relPathCommand, no need to modify all commands like if setData() was extended.
Cons: Increases global state.
Alternative 2: Extend Command.setData() to take in GraphWrapper
Pros: Similar to how other components are allowed to interact with commands, better consistency.
Cons: Since the graph display is a GUI component, no straightforward way to have Command access it. Also means that every command’s setData() has to be modified to take into account an external parameter.
3.8. Enhanced find command
A basic find command is given in the original codebase which allows persons to be found using their names.
In order to enhance the find command, the find command is extended to support searches by name/email/phone number/address/tag. This is implemented in the style of the add command, and restricts the search to a particular aspect through parsing prefixes (/n, /p, /e, /a, /t). Without a prefix (i.e. find), the search is global, and returns any matches in any aspects (name/email/phone number/address/tag).
3.8.1. Design Considerations
Aspect: Implementation for enhanced find command
Alternative 1 (current choice): Adapt current FindCommand and add new predicates for each new type of search.
Pros: Easier to implement since we can reuse existing resources such as ArgumentTokenizer used in add command.
Cons: Implementation is less modular.
Alternative 2: Add a new subclass inheriting from FindCommand for each new type of search.
Pros: Implementation is more modular, and developers can update code more easily.
Cons: More tedious to implement since we cannot make use of existing resources such as ArgumentTokenizer used in add command.
Aspect: Type of command implemented
Alternative 1 (current choice): find command inherits from Command instead of UndoableCommand.
Pros: Easier to implement since we do not need to keep track of previous searches.
Cons: User has to retype all search fields if user wants to repeat a particular search.
Alternative 2: find command inherits from UndoableCommand.
Pros: find becomes undoable, and user can repeat a find easily by undoing the command.
Cons: It is unlikely that a user will repeat a find multiple times in a short period of time, rendering this option somewhat unnecessary.
Aspect: User input for narrowed search field in enhanced find command
Alternative 1 (current choice): Parse prefix in user input to narrow the search to a particular aspect (e.g. n/).
Pros: Easier for user for learn command since it is similar to the add command format.
Cons: Must remember exact prefix for each search field (i.e. /n, /p, /e, /a, /t).
Alternative 2: Parse full keywords in user input to narrow the search to a particular aspect (e.g. name/).
Pros: More intuitive for users as they can simply type what they want to look for.
Cons: User has to type longer commands.
Aspect: Scope of narrowed search
Alternative 1 (current choice): Users can only search within a single narrowed field, or must search through all possible fields (e.g. cannot search for names and emails only).
Pros: Easier to implement, parser only needs to check for a single prefix type and create corresponding predicate for the prefix type.
Cons: Fewer search choices available for users.
Alternative 2: Users can search within an arbitrary number of narrowed fields (e.g. can search for names and emails only, or search for names, emails, and addresses).
Pros: More search options available for users, more advanced search functions.
Cons: Harder to implement since the parser will have to handle more prefixes.
3.9. Undo/Redo mechanism
The undo/redo mechanism is facilitated by an UndoRedoStack, which resides inside LogicManager. It supports undoing and redoing of commands that modifies the state of the address book (e.g. add, edit). Such commands will inherit from UndoableCommand.
UndoRedoStack only deals with UndoableCommands. Commands that cannot be undone will inherit from Command instead. The following diagram shows the inheritance diagram for commands:
As you can see from the diagram, UndoableCommand adds an extra layer between the abstract Command class and concrete commands that can be undone, such as the DeleteCommand. Note that extra tasks need to be done when executing a command in an undoable way, such as saving the state of the address book before execution. UndoableCommand contains the high-level algorithm for those extra tasks while the child classes implements the details of how to execute the specific command. Note that this technique of putting the high-level algorithm in the parent class and lower-level steps of the algorithm in child classes is also known as the template pattern.
Commands that are not undoable are implemented this way:
public class ListCommand extends Command {
    @Override
    public CommandResult execute() {
        // ... list logic ...
    }
}
With the extra layer, the commands that are undoable are implemented this way:
public abstract class UndoableCommand extends Command {
    @Override
    public CommandResult execute() {
        // ... undo logic ...

        executeUndoableCommand();
    }
}

public class DeleteCommand extends UndoableCommand {
    @Override
    public CommandResult executeUndoableCommand() {
        // ... delete logic ...
    }
}
Suppose that the user has just launched the application. The UndoRedoStack will be empty at the beginning.
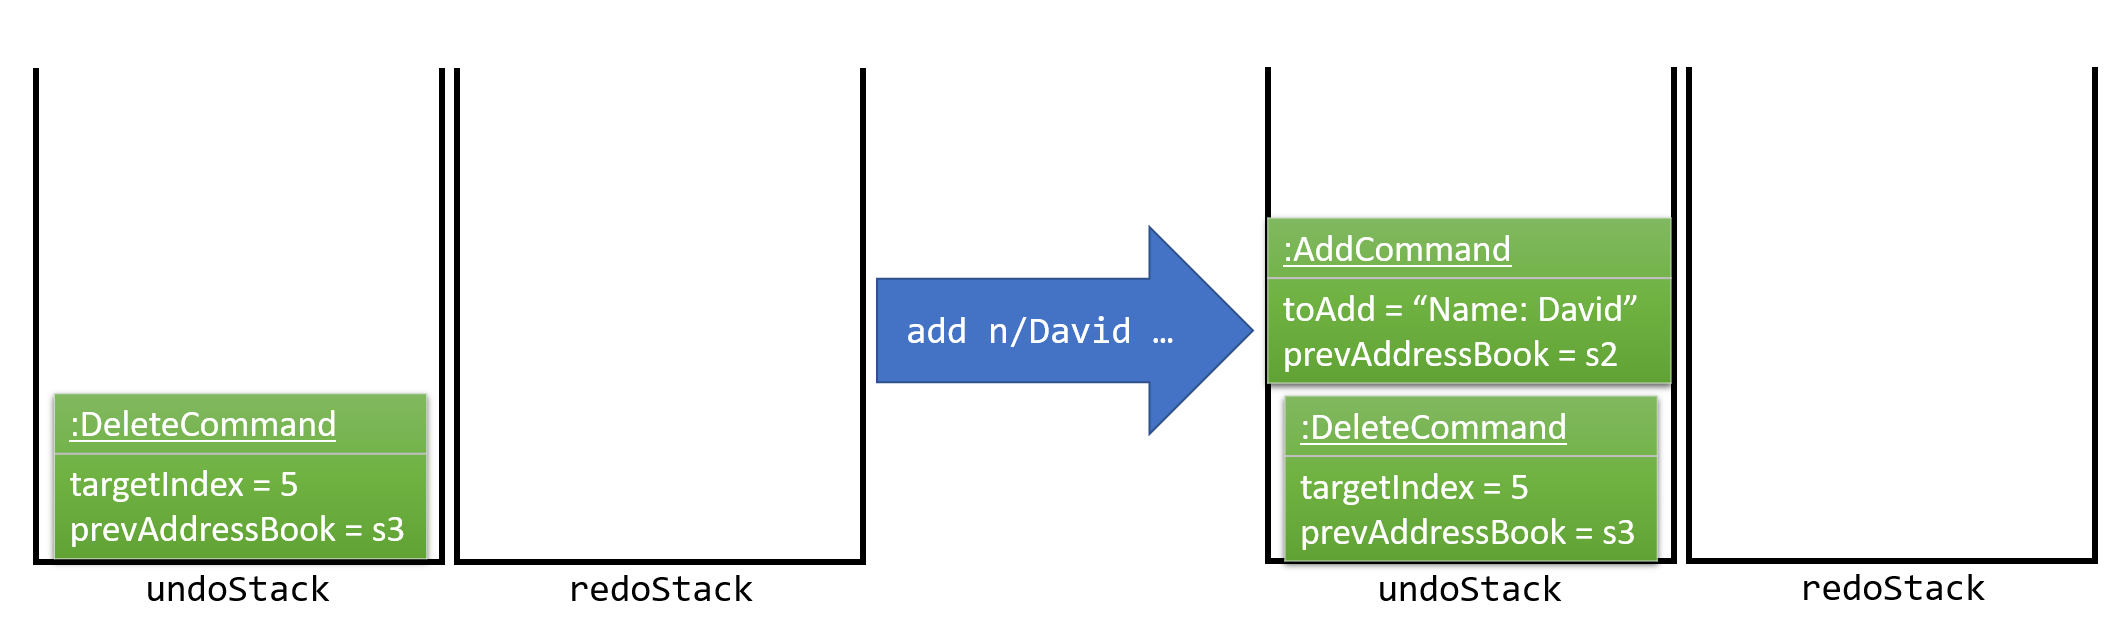
The user executes a new UndoableCommand, delete 5, to delete the 5th person in the address book. The current state of the address book is saved before the delete 5 command executes. The delete 5 command will then be pushed onto the undoStack (the current state is saved together with the command).

As the user continues to use the program, more commands are added into the undoStack. For example, the user may execute add n/David … to add a new person.
If a command fails its execution, it will not be pushed to the UndoRedoStack at all.
|
The user now decides that adding the person was a mistake, and decides to undo that action using undo.
We will pop the most recent command out of the undoStack and push it back to the redoStack. We will restore the address book to the state before the add command executed.
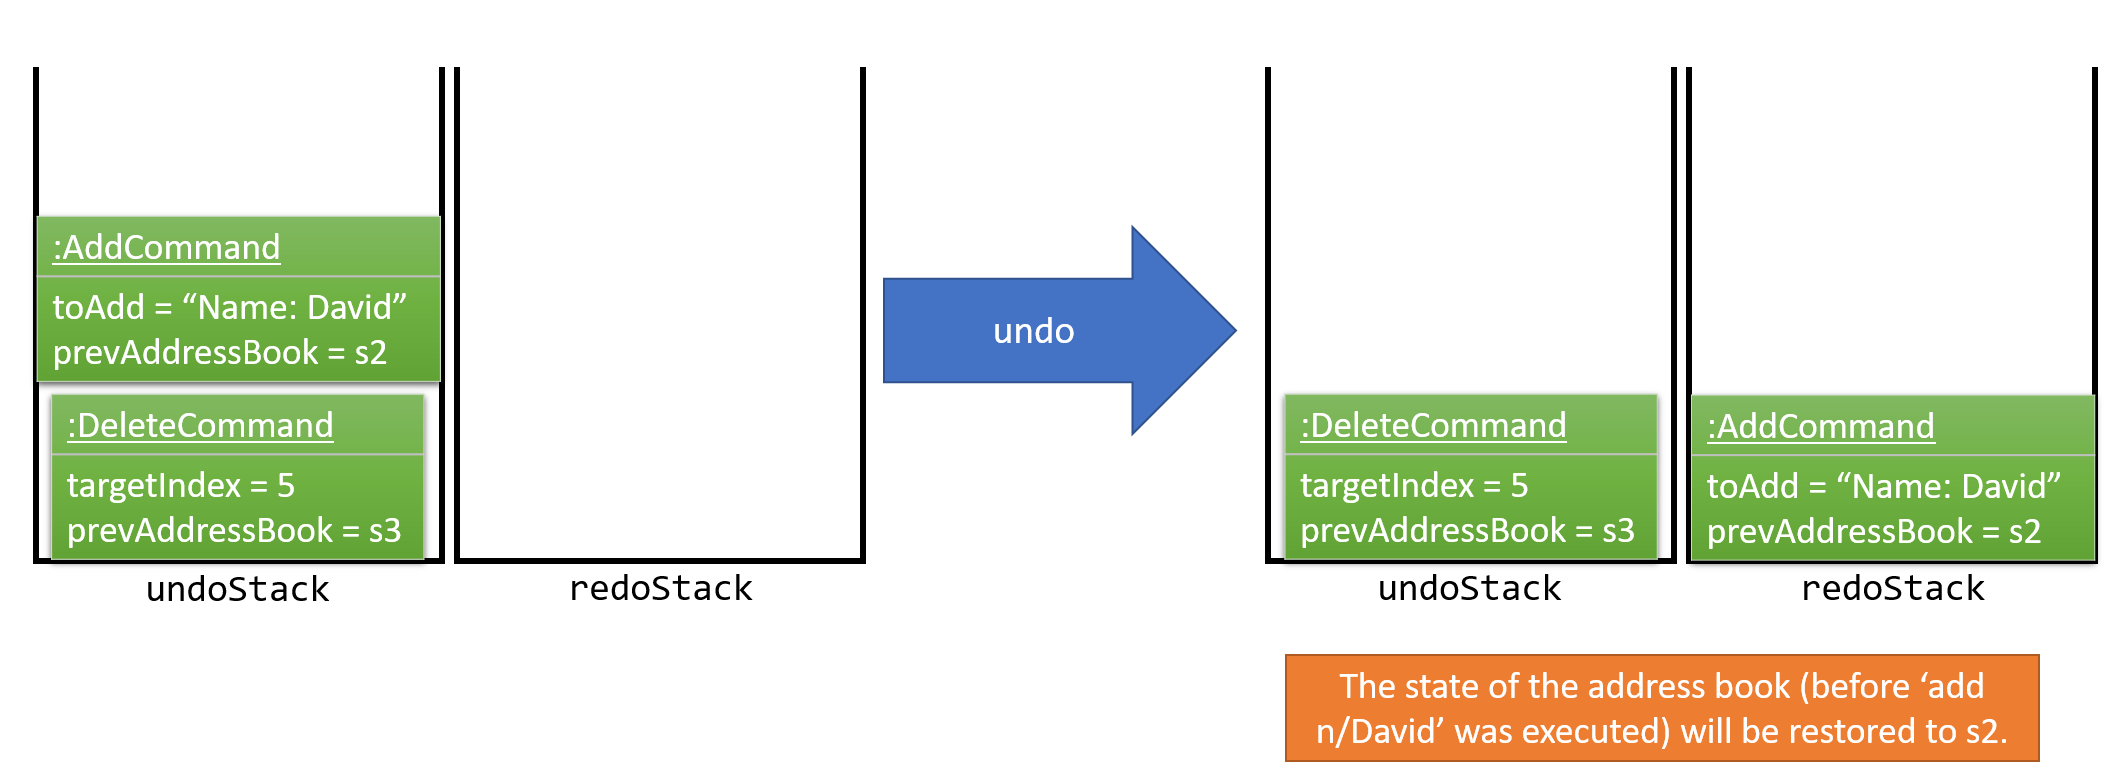
If the undoStack is empty, then there are no other commands left to be undone, and an Exception will be thrown when popping the undoStack.
|
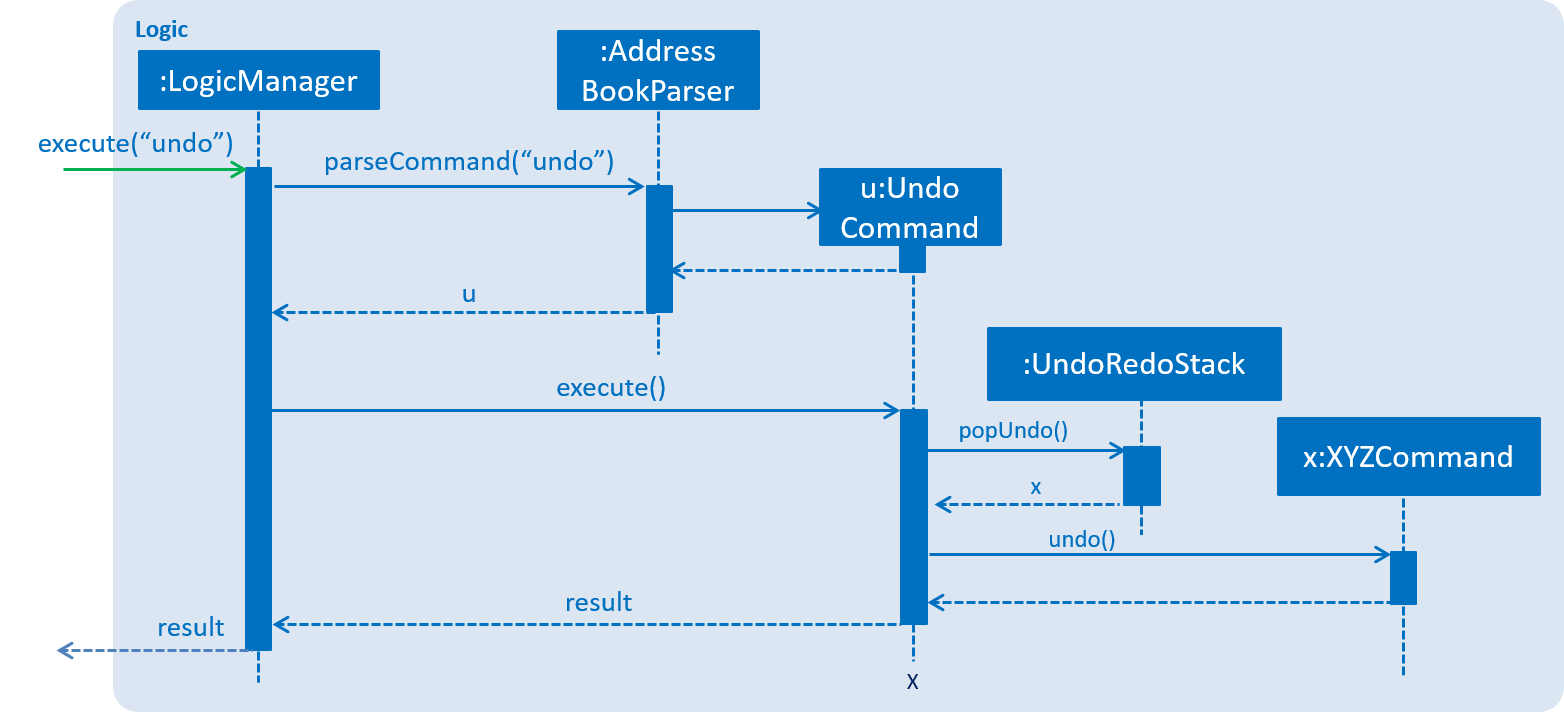
The following sequence diagram shows how the undo operation works:
The redo does the exact opposite (pops from redoStack, push to undoStack, and restores the address book to the state after the command is executed).
If the redoStack is empty, then there are no other commands left to be redone, and an Exception will be thrown when popping the redoStack.
|
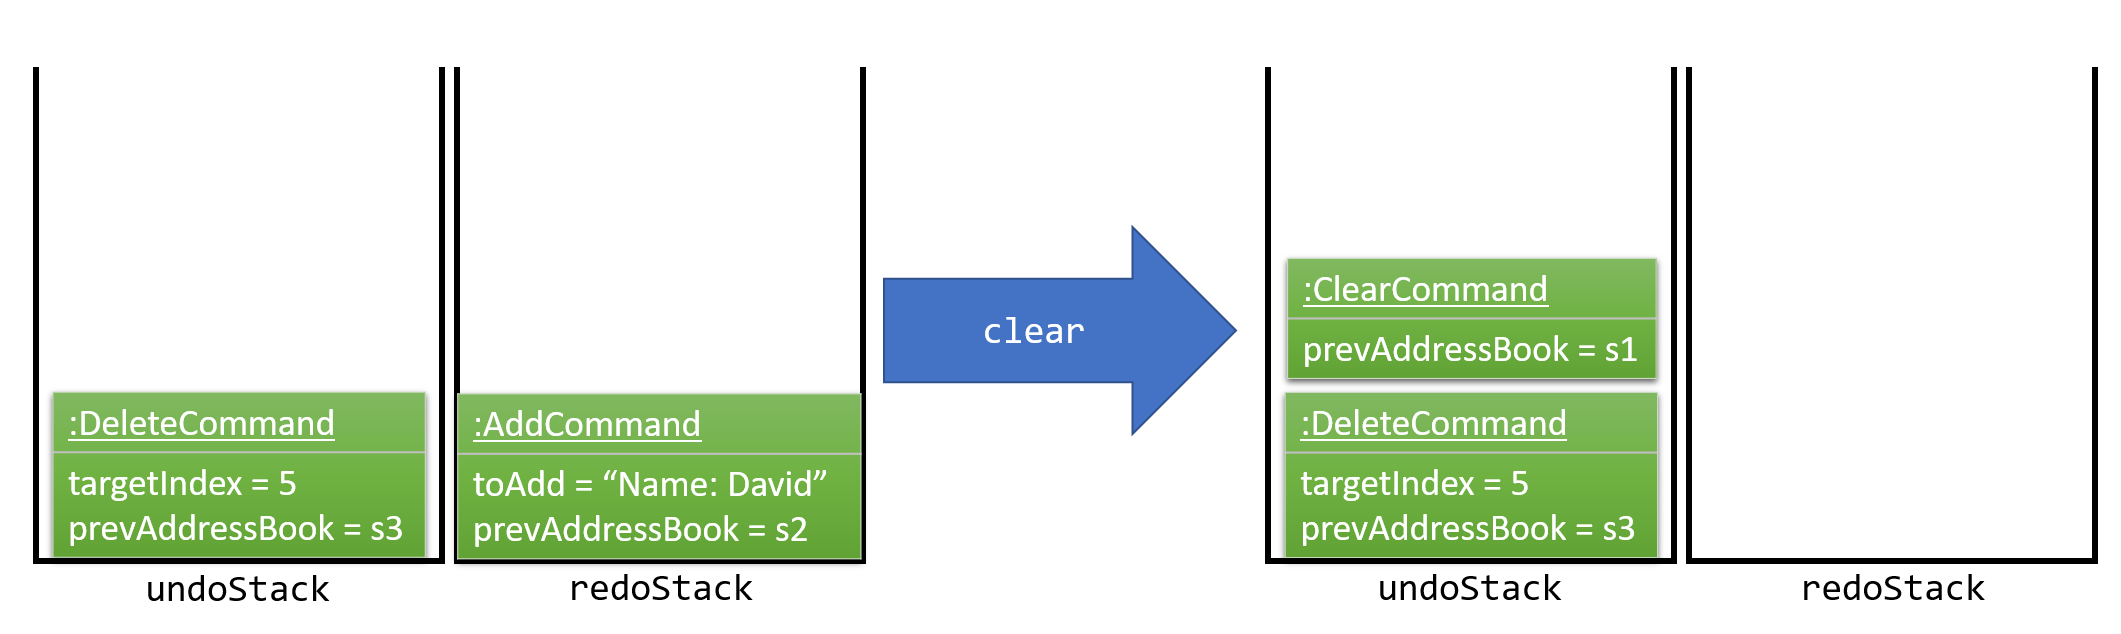
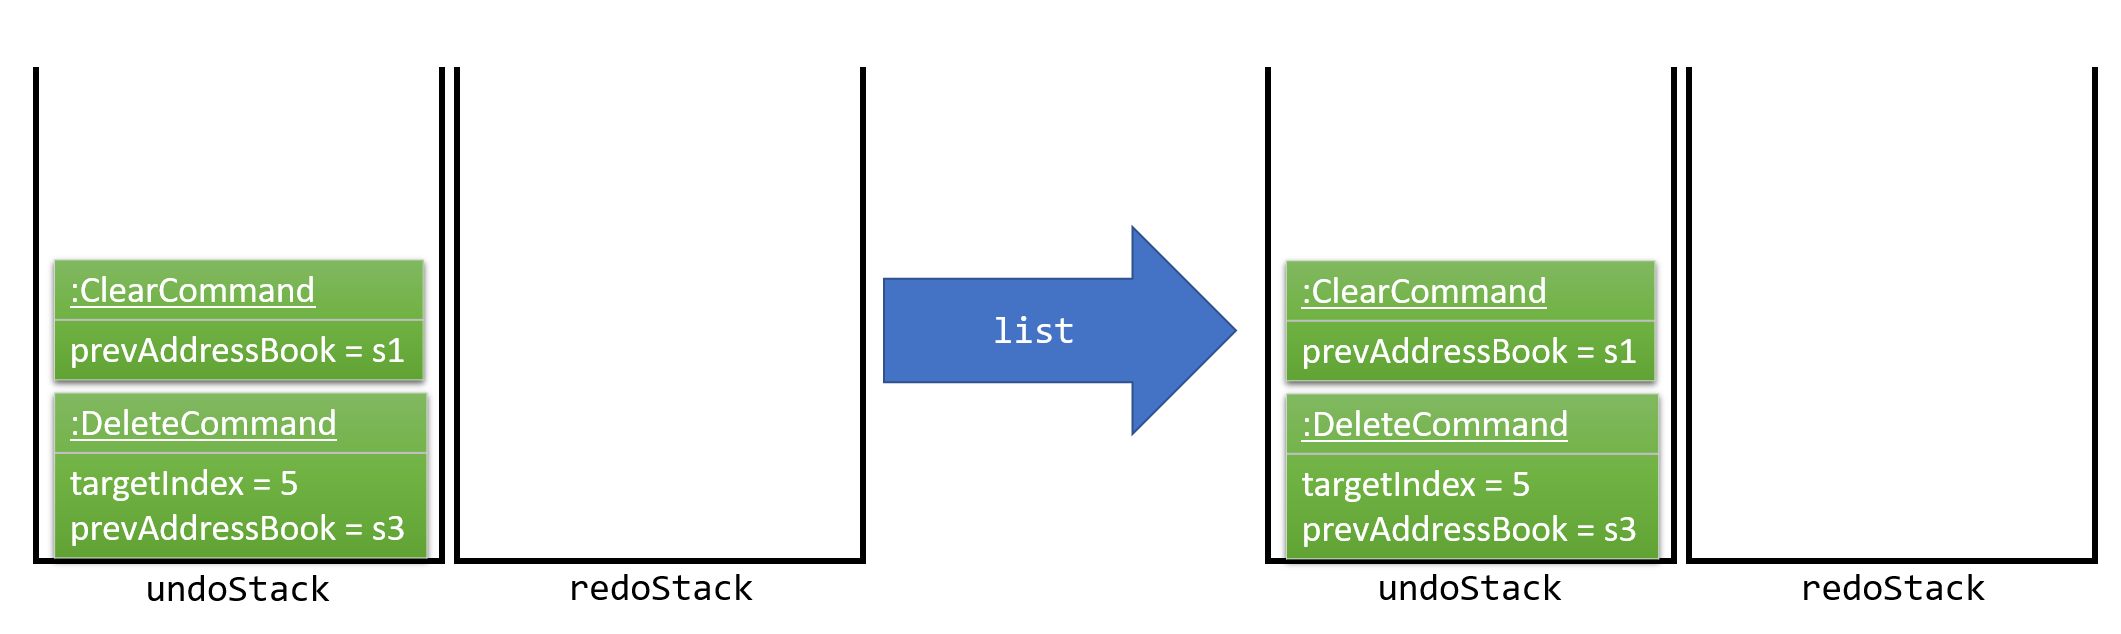
The user now decides to execute a new command, clear. As before, clear will be pushed into the undoStack. This time the redoStack is no longer empty. It will be purged as it no longer make sense to redo the add n/David command (this is the behavior that most modern desktop applications follow).
Commands that are not undoable are not added into the undoStack. For example, list, which inherits from Command rather than UndoableCommand, will not be added after execution:
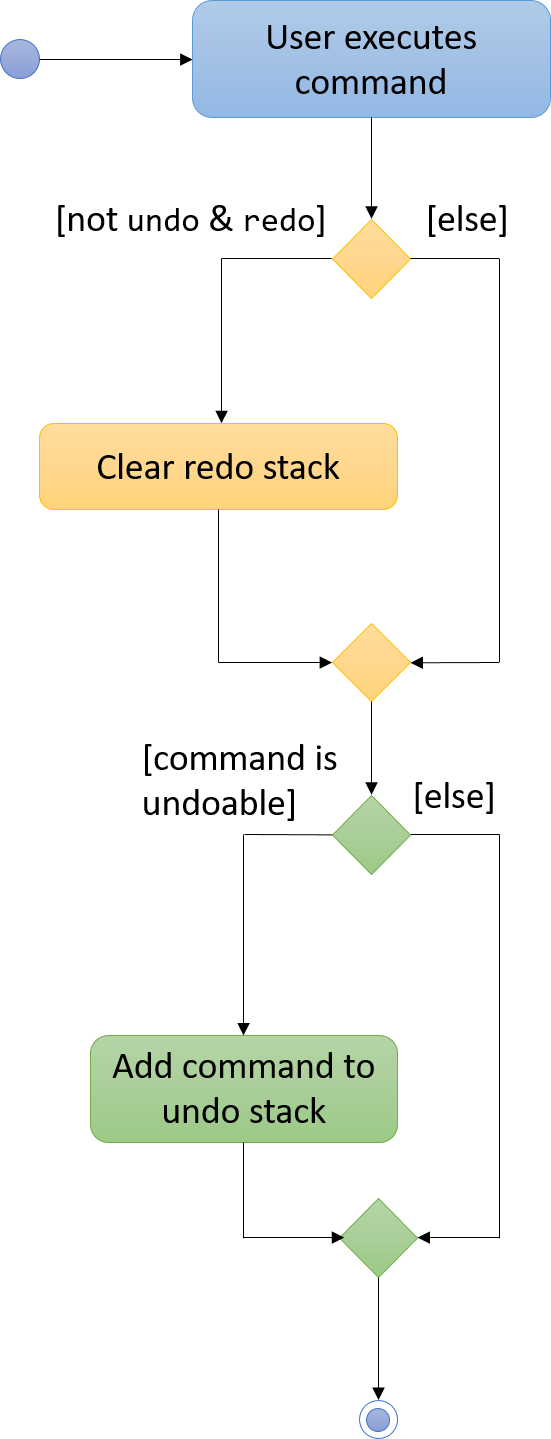
The following activity diagram summarize what happens inside the UndoRedoStack when a user executes a new command:
3.9.1. Design Considerations
Aspect: Implementation of UndoableCommand
Alternative 1 (current choice): Add a new abstract method executeUndoableCommand()
Pros: We will not lose any undone/redone functionality as it is now part of the default behaviour. Classes that deal with Command do not have to know that executeUndoableCommand() exist.
Cons: Hard for new developers to understand the template pattern.
Alternative 2: Just override execute()
Pros: Does not involve the template pattern, easier for new developers to understand.
Cons: Classes that inherit from UndoableCommand must remember to call super.execute(), or lose the ability to undo/redo.
Aspect: How undo & redo executes
Alternative 1 (current choice): Saves the entire address book.
Pros: Easy to implement.
Cons: May have performance issues in terms of memory usage.
Alternative 2: Individual command knows how to undo/redo by itself.
Pros: Will use less memory (e.g. for delete, just save the person being deleted).
Cons: We must ensure that the implementation of each individual command are correct.
Aspect: Type of commands that can be undone/redone
Alternative 1 (current choice): Only include commands that modifies the address book (add, clear, edit).
Pros: We only revert changes that are hard to change back (the view can easily be re-modified as no data are lost).
Cons: User might think that undo also applies when the list is modified (undoing filtering for example), only to realize that it does not do that, after executing undo.
Alternative 2: Include all commands.
Pros: Might be more intuitive for the user.
Cons: User have no way of skipping such commands if he or she just want to reset the state of the address book and not the view.
Additional Info: See our discussion here.
Aspect: Data structure to support the undo/redo commands
Alternative 1 (current choice): Use separate stack for undo and redo
Pros: Easy to understand for new Computer Science student undergraduates to understand, who are likely to be the new incoming developers of our project.
Cons: Logic is duplicated twice. For example, when a new command is executed, we must remember to update both HistoryManager and UndoRedoStack.
Alternative 2: Use HistoryManager for undo/redo
Pros: We do not need to maintain a separate stack, and just reuse what is already in the codebase.
Cons: Requires dealing with commands that have already been undone: We must remember to skip these commands. Violates Single Responsibility Principle and Separation of Concerns as HistoryManager now needs to do two different things.
3.10. Enhanced add command mechanism
A more flexible add command that only requires the name to be specified at the time of its execution. The other fields such as phone, email, address and remark need not be specified at the time of add command execution but the user can still choose to do so if they desire.
The Command is still being supported by the undoableCommand class and user will be able to undo or redo this command.
The unspecified field will be substituted by the string "unspecified field". For example, an unspecified phone number that is not typed in during add command execution will result in "unspecified Phone" to be displayed under the newly added person entry.
Before: all fields needs to be specified before adding is done successfully

After: Only name is compulsory for a successful add command

A separate parser for phone, email, address and remark is used to accommodate this enhancement to isolate the interdependency between the modified enhanced add command with the other commands.
An example is the parsePhone method which is also shared with editCommand, hence modifying the parsePhone method will cause a dependency issue for editCommand as well since they requires different parsing method after addCommand is enhanced.
Therefore a separate parseAddPhone method is created so that such dependency can be avoided. This is also being implemented to all the other non compulsory fields (email, address, remark).

It works by instead of returning an empty Optional field, example an empty Phone object which sets its own attribute of phone string to null, we used a substitute string "unspecified Phone" instead.
This implementation ensures that the Phone object is not carrying a null string attribute which can cause problems for other components but instead is carrying a predefined "unspecified Phone" string.
This is applied across all other optional fields with the exception of name which is made compulsory.
The initial compulsory checks for prefix is also changed from requiring all prefixes to be present to only requiring name prefix to be compulsory.

3.10.1. Design Considerations
Aspect: Implementation of enhanced addCommand
Alternative 1 (current choice): Add new parser methods parseAddPhone, parseAddEmail and parseAddAddress
Pros: Able to isolate the behaviour of the add command and the edit command so that editing an existing Person will not overwrite the fields that should not be edited.
Cons: More difficult to implement as more test cases has to be added for the new parser methods.
Alternative 2: Modify existing parser method parsePhone, parseEmail and parseAddress
Pros: Easier to implement as we can re-use existing tests and codes and just add minor modifications
Cons: The behaviour of edit command overlaps with the behaviour of the add command, causing unintended overwrite of other fields such as address when we don’t want to.
Aspect: Implement separate remark instead of modifying tag
Alternative 1 (current choice): Create a new separate remark command
Pros: Able to provide a cleaner user interface and experience. Also reduces complications in modifying existing working tag system.
Cons: More work has to be done in testing and creating a new command.
Alternative 2: update the tag to accept sentences for remarks
Pros: Easy to implement as we do not need to add a new command.
Cons: The Tag may be more difficult to find and more work is needed to change the find tag command. Additionally, the user interface of tag command also needs to be changed to accommodate long tags.
Aspect: Defining a valid remark input
Alternative 1 (current choice): No restrictions on the kind of remark input the user can put into the addressbook, i.e. the user can put in any characters in any format.
Pros: More freedom for the user as the user can type in anything for adding a remark. It is also easier to implement as the input string does not have to go through other checks.
Cons: Can get messy if the user is not consistent in the way they place in remarks. The sort command applied under remarks also does not sort the remark as well if the input is not consistent.
Alternative 2: Impose a restriction on remarks in the format [Remark Type] remark followed by restriction of only allowing alphabets.
Pros: . The sort remark command will be able to organise and sort the remark better since each remarks are predefined at the start in the [Remark Type].
Cons: . More difficult to implement as we need additional checks to be placed for the restrictions and also less freedom for the user as they need to follow stricter rules before putting in a remark entry.
3.11. Sort Command mechanism
The SortCommandParser will parse the respective PREFIX that the user typed ( n/, p/, e/, a/, r/) and returns an enum of Option sortOption corresponding to the various sort types to SortCommand.

The passed sortOption will traverse through the following classes in sequence :
1.SortCommandParser
2.SortCommand
3.ModelManager
4.AddressBook
5.UniquePersonList
The UniquePersonList will then create the respective sort comparator in which to sort the Person object with using the passed sortOption.
For example, for sortOption == Option.NAME, the comparator that compares the Person object’s name attribute is assigned to the compare variable for sorting by name.

The Sequence Diagram of the SortCommand is given below. It uses both Logic and Model component.


3.11.1. Design Considerations
Aspect: Implementation of sort command
Alternative 1 (current choice): Integrate the various sort types ( by name, phone, email, address, remark) into a single command
Pros: Easier to implement and more straight forward for the user.
Cons: More standardised and less customizable sort since all the various sort types sorts by alphanumeric values in their corresponding ASCII values.
Alternative 2: Have a separate command for each sort types
Pros: More customizable sort as each different sort type can take in different parameters. For example, the address sort can request for parameters to sort by address number and street name.
Cons: More difficult to implement and less user friendly as user have to key in more parameters and remember more things before sorting.
3.12. clearHistory command mechanism
The clearHistory command is implemented as a regular command that calls .clear() methods added to CommandHistory and UndoRedoStack, which clears the command history and the undo/redo stack respectively.
3.12.1. Design Considerations
Aspect: Type of clearHistory command
Alternative 1 (current choice): Command
Pros: History is permanently cleared.
Cons: Impossible to undo accidental clearing of history, meaning all undoable changes become permanent.
Alternative 2: UndoableCommand
Pros: Possible to undo accidental clearing of history.
Cons: Since the most likely use for clearHistory is for it to be permanent, having it be undoable is counterintuitive to user expectations.
Aspect: Behaviour of clearHistory command on empty history
Alternative 1 (current choice): Clear anyway and indicate success
Pros: Simple to implement, no additional cases to take care of.
Cons: May be confusing to declare an empty history cleared.
Alternative 2: Indicate that history is empty.
Pros: Clearer messages about the state of the command history.
Cons: More complex to implement, and the end result of clearing an empty history also results in a cleared history, meaning the user intention of clearing their history is fufilled regardless of which alternative is chosen.
3.13. Logging
We are using java.util.logging package for logging. The LogsCenter class is used to manage the logging levels and logging destinations.
-
The logging level can be controlled using the
logLevelsetting in the configuration file (See Configuration) -
The
Loggerfor a class can be obtained usingLogsCenter.getLogger(Class)which will log messages according to the specified logging level -
Currently log messages are output through:
Consoleand to a.logfile.
Logging Levels
-
SEVERE: Critical problem detected which may possibly cause the termination of the application -
WARNING: Can continue, but with caution -
INFO: Information showing the noteworthy actions by the App -
FINE: Details that is not usually noteworthy but may be useful in debugging e.g. print the actual list instead of just its size
3.14. Configuration
Certain properties of the application can be controlled (e.g App name, logging level) through the configuration file (default: config.json).
4. Documentation
We use asciidoc for writing documentation.
| We chose asciidoc over Markdown because asciidoc, although a bit more complex than Markdown, provides more flexibility in formatting. |
4.1. Editing Documentation
See UsingGradle.adoc to learn how to render .adoc files locally to preview the end result of your edits.
Alternatively, you can download the AsciiDoc plugin for IntelliJ, which allows you to preview the changes you have made to your .adoc files in real-time.
4.2. Publishing Documentation
See UsingTravis.adoc to learn how to deploy GitHub Pages using Travis.
4.3. Converting Documentation to PDF format
We use Google Chrome for converting documentation to PDF format, as Chrome’s PDF engine preserves hyperlinks used in webpages.
Here are the steps to convert the project documentation files to PDF format.
-
Follow the instructions in UsingGradle.adoc to convert the AsciiDoc files in the
docs/directory to HTML format. -
Go to your generated HTML files in the
build/docsfolder, right click on them and selectOpen with→Google Chrome. -
Within Chrome, click on the
Printoption in Chrome’s menu. -
Set the destination to
Save as PDF, then clickSaveto save a copy of the file in PDF format. For best results, use the settings indicated in the screenshot below.
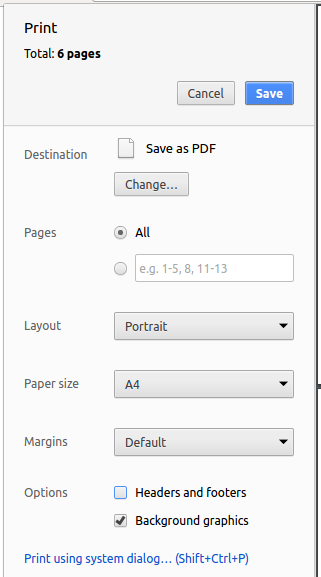
Figure 5.6.1 : Saving documentation as PDF files in Chrome
5. Testing
5.1. Running Tests
There are three ways to run tests.
| The most reliable way to run tests is the 3rd one. The first two methods might fail some GUI tests due to platform/resolution-specific idiosyncrasies. |
Method 1: Using IntelliJ JUnit test runner
-
To run all tests, right-click on the
src/test/javafolder and chooseRun 'All Tests' -
To run a subset of tests, you can right-click on a test package, test class, or a test and choose
Run 'ABC'
Method 2: Using Gradle
-
Open a console and run the command
gradlew clean allTests(Mac/Linux:./gradlew clean allTests)
| See UsingGradle.adoc for more info on how to run tests using Gradle. |
Method 3: Using Gradle (headless)
Thanks to the TestFX library we use, our GUI tests can be run in the headless mode. In the headless mode, GUI tests do not show up on the screen. That means the developer can do other things on the Computer while the tests are running.
To run tests in headless mode, open a console and run the command gradlew clean headless allTests (Mac/Linux: ./gradlew clean headless allTests)
5.2. Types of tests
We have two types of tests:
-
GUI Tests - These are tests involving the GUI. They include,
-
System Tests that test the entire App by simulating user actions on the GUI. These are in the
systemtestspackage. -
Unit tests that test the individual components. These are in
seedu.address.uipackage.
-
-
Non-GUI Tests - These are tests not involving the GUI. They include,
-
Unit tests targeting the lowest level methods/classes.
e.g.seedu.address.commons.StringUtilTest -
Integration tests that are checking the integration of multiple code units (those code units are assumed to be working).
e.g.seedu.address.storage.StorageManagerTest -
Hybrids of unit and integration tests. These test are checking multiple code units as well as how the are connected together.
e.g.seedu.address.logic.LogicManagerTest
-
5.3. Troubleshooting Testing
Problem: HelpWindowTest fails with a NullPointerException.
-
Reason: One of its dependencies,
UserGuide.htmlinsrc/main/resources/docsis missing. -
Solution: Execute Gradle task
processResources.
6. Dev Ops
6.1. Build Automation
See UsingGradle.adoc to learn how to use Gradle for build automation.
6.2. Continuous Integration
We use Travis CI and AppVeyor to perform Continuous Integration on our projects. See UsingTravis.adoc and UsingAppVeyor.adoc for more details.
6.3. Making a Release
Here are the steps to create a new release.
-
Update the version number in
MainApp.java. -
Generate a JAR file using Gradle.
-
Tag the repo with the version number. e.g.
v0.1 -
Create a new release using GitHub and upload the JAR file you created.
6.4. Managing Dependencies
A project often depends on third-party libraries. For example, Intelli depends on the GraphStream for the graph display. Managing these dependencies can be automated using Gradle. For example, Gradle can download the dependencies automatically, which is better than these alternatives.
a. Include those libraries in the repo (this bloats the repo size)
b. Require developers to download those libraries manually (this creates extra work for developers)
Appendix A: User Stories
Priorities: High (must have) - * * *, Medium (nice to have) - * *, Low (unlikely to have) - *
| Priority | As a … | I want to … | So that I can… |
|---|---|---|---|
Create operations |
|||
|
user |
add a new person |
|
|
user |
add tags to a person |
categorise the people I know |
|
user |
add relationships between people |
show that two persons know each other |
|
user |
add named relationships between people |
show that two persons know each other via a specific method |
|
user |
add confidence estimate to a person’s attributes |
differentiate between verified and unverified pieces of information |
|
user |
add remarks about a relationship between people |
record detailed information about the relationship between two people |
|
user with many persons in the address book |
add profile pictures to each person |
distinguish between people with the same name |
Read operations |
|||
|
new user |
see usage instructions |
refer to instructions when I forget how to use the App |
|
user |
see the network of relationships between people |
visualise connections and groups in the network |
|
user |
see the history of commands I have typed |
keep track of what I have done to my address book |
|
user |
see the people a person is related to |
find people related to a person |
|
user |
display relationships only above a certain confidence estimate |
find a more confident way to know a person |
Find operations |
|||
|
user |
find a person by name |
locate details of persons without having to go through the entire list |
|
user |
find a person by address |
locate people who are physically close to each other |
|
user |
find a person by tag |
locate people who are in the same category |
|
user |
find a person by email |
locate people who may share the same emails / domains (working for same company) |
|
user |
find shortest relationship distance between two people |
find the most efficient way to know a person |
Update operations |
|||
|
user with many persons in the address book |
sort persons by name |
locate a person easily |
|
user |
update a person’s details |
update a person’s details without having to create a new contact |
|
user |
update name of the relationship of a relationship |
show that two persons know each other via a specific method |
|
user |
update confidence estimate of a relationship |
differentiate between verified and unverified pieces of information |
|
user |
change the colour of the network |
personalise my address book |
Delete operations |
|||
|
user |
delete a person |
remove entries that I no longer need |
|
user |
delete relationships between people |
remove relationships between people that are incorrect |
|
user |
delete all persons |
reset my address book easily |
|
cautious user |
clear my history |
hide my previous commands from later users |
|
user |
remove confidence estimate from a person’s attributes |
remove unneeded confidence estimates |
Other operations |
|||
|
careless user |
undo the last command that I made |
revert any mistakes |
|
careless user |
redo the last command that I made |
undo my 'undo' |
|
advanced user |
type shorter command aliases |
do operations faster |
|
user |
set a password for my address book |
keep my address book private |
|
user |
share my address book with other people |
|
|
user |
have the program autocorrect my commands |
input information correctly |
Appendix B: Use Cases
(For all use cases below, the System is Intelli and the Actor is the user, unless specified otherwise)
Use case: Delete person
MSS
-
User requests to list persons
-
AddressBook shows a list of persons
-
User requests to delete a specific person in the list
-
AddressBook deletes the person
Use case ends.
Extensions
-
2a. The list is empty.
Use case ends.
-
3a. The given index is invalid.
-
3a1. AddressBook shows an error message.
Use case resumes at step 2.
-
Use case: Edit a person’s details
MSS
-
User requests to list persons
-
AddressBook shows a list of persons
-
User requests to edit the details of a specific person in the list
-
AddressBook updates details of the specified person
Use case ends.
Extensions
-
2a. The list is empty.
Use case ends.
-
3a. The given index is invalid.
-
3a1. AddressBook shows an error message.
Use case resumes at step 2.
-
-
3b. User does not specify field to edit.
-
3b1. AddressBook shows an error message.
Use case resumes at step 2.
-
-
3c. User updates valid field with new value that is invalid.
-
3c1. AddressBook shows an error message.
Use case resumes at step 2.
-
Use case: Undo last undoable command
MSS
-
User requests to undo last undoable command
-
AddressBook undoes the last undoable command
Use case ends.
Extensions
-
3a. The
undocommand is the first command.-
3a1. AddressBook shows an error message.
Use case ends.
-
Use case: Redo most recent undone command
MSS
-
User requests to redo most recently undone command
-
AddressBook redoes the last undone command
Use case ends.
Extensions
-
3a. The
redocommand is the first command-
3a1. AddressBook shows an error message.
Use case ends.
-
Use case: Add a relationship between two persons
MSS
-
User requests to list persons
-
AddressBook shows a list of persons
-
User requests to link two specific persons in the list
-
AddressBook links those two persons
Use case ends.
Extensions
-
2a. The list is empty.
Use case ends.
-
3a. Either of the given indices is invalid.
-
3a1. AddressBook shows an error message.
Use case resumes at step 2.
-
Use case: Delete a relationship between two persons
MSS
-
User requests to list persons
-
AddressBook shows a list of persons
-
User requests to delete a relationship between two specific persons
-
AddressBook deletes the relationship between those two persons
Use case ends.
Extensions
-
2a. The list is empty.
Use case ends.
-
3a. Either of the given indices is invalid.
-
3a1. AddressBook shows an error message.
Use case resumes at step 2.
-
Use case: making remark using add command and edit command
MSS
-
User requests to list persons
-
AddressBook shows a list of persons
-
User requests to add/update the remark to a specific person in the list
-
AddressBook add/update the remark of the specified person
Use case ends.
Extensions
-
2a. The list is empty.
Use case ends.
-
3a. The given index is invalid.
-
3a1. AddressBook shows an error message.
Use case resumes at step 2.
-
-
3b. User does not specify a remark to add.
-
3b1. AddressBook overwrites the previous remark and replaced it with an empty remark.
Use case ends.
-
-
3c. User updates valid remark with new value that is invalid.
-
3c1. AddressBook shows an error message.
Use case resumes at step 2.
-
Use case: sort a list of persons
MSS
-
User requests to sort a list of persons by name, phone, email, address or remark
-
AddressBook checks if input is valid and what type of sort to apply
-
AddressBook sorts a list of persons alphanumerically by name, phone, email, address or remark
-
AddressBook shows all sorted persons in the sorted list
Use case ends.
Extensions
-
2a. The list is empty.
Use case ends.
-
3a. The given prefix is invalid.
-
3a1. AddressBook shows an error message.
Use case resumes at step 2.
-
{More to be added}
Appendix C: Non Functional Requirements
-
Should work on any mainstream OS as long as it has Java
1.8.0_60or higher installed. -
Should be able to hold up to 1000 persons without a noticeable sluggishness in performance for typical usage.
-
A user with above average typing speed for regular English text (i.e. not code, not system admin commands) should be able to accomplish most of the tasks faster using commands than using the mouse.
-
Should be able to give a response within 1 second
-
Should be able to hide personal information
-
Should be simple enough for a novice to utilise and navigate
-
Data should only be read and modified by authorized party
-
Should be easily maintained by other programmers
Appendix D: Glossary
Command alias
Shorthand form of a command
Confidence estimate
A percentage that represents how confident the user is in the information of the relationship being accurate
Mainstream OS
Windows, Linux, Unix, OS-X
Relationship name
A specific status for the relationship(eg. lecturer-student)